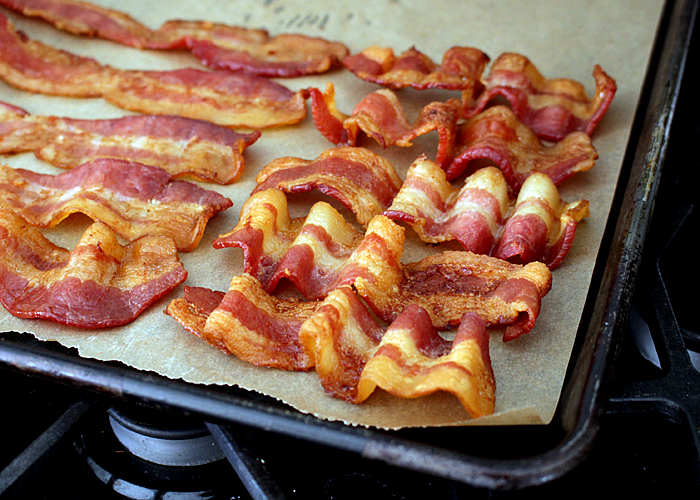
I can bring home the bacon. But it will be a cold, bacon fat-splattered day in hell before I'll ever fry it up in a pan again. Here's how to cook bacon in the oven, which is the cleanest way to do it, and a technique for making picture-perfect Wavy Bacon Strips. Shall we?

post updated December 2025, originally published November 2016
Why Cook Bacon in the Oven?
Two words. Clean. Up.
If you use a rimmed baking sheet and cover with aluminum foil up the sides and over, the foil will capture all the rendered bacon grease, and as you know, it's a lot of grease, which you can just roll up and throw away in the trash. If you do it right, you might not even have to wash the pan, just the rack. Of course, if you go DIY and make a "rack" out of strips of crumpled aluminum foil to make the strips wavy, you won't even have to wash a rack, either.
Ostensibly, you cook bacon in the oven because you're cooking a whole package for a large group. But even if you're cooking for one, I highly recommend you still avoid making a mess on the stovetop and go ahead and cook the entire package all at once in the oven. Save the leftovers as pre-cooked bacon, which keeps in the refrigerator for a few days, or in the freezer for up to a month.

Do You Need a Rack to Make Wavy Bacon Strips?
Short answer? No. You don't need a rack to make Wavy Bacon Strips.
Actual answer? No, you don't need an actual rack that's intended for cooking bacon, though it helps! If you don't have one, and don't want to buy yet another tool that will inevitably take up space in your storage for the 363 days of the year that you don't make bacon, then you can create a make-shift rack out of crumpled up aluminum foil.
Equipment You Need:
- Rimmed baking sheet. This is a baking sheet that has at least a ½-inch high rim. You can't really use a completely flat baking sheet like a cookie sheet otherwise rendered fat will drip off the sides and that's a fire hazard if I've ever seen one.
- Aluminum foil. Use this to line your rimmed baking sheet, making sure to go all the way and over the sides to capture all the rendered bacon fat. This makes clean-up much faster and easier. If you don't mind washing dishes with bacon grease on them, you can skip this.
- Wire rack. If you want to make Wavy Bacon Strips, you want a rack with only one set of lines going in one direction, not the kind with a grid pattern. If you just want to cook the bacon flat, you can use the grid pattern rack. Semi pro-tip: You can use any oven-safe metal rack that has one set of lines, like from a toaster oven, which is what I did for a while at first.
How to Cook Bacon the Oven into Wavy Strips
- Move oven racks to make sure there is enough space for the baking sheet with the baking rack on it. Heat oven to 400°F.
- Line the rimmed baking sheet with aluminum foil, going up and over the sides. The aluminum foil will catch the bacon grease as it renders out and drips into the pan, making clean-up easier.
- Place a strip of bacon with one end on the far edge of the rack. Fold the end over the bar and let it hang down by about 1-inch. Carefully push small sections of the rest of the bacon strip down between the bars of the rack, letting the sections hang down about ¾-inch. The bacon shrinks as it cooks and will lift itself up slightly from between the bars. Depending on how many waves you shape into the bacon strip, let the end piece hang down through the bars as long as it's not too long, or pinch the end around a bar. See photo for guidance.
- Repeat the same process with all of the bacon strips. It is okay if the bacon strips touch each other, but do not let them overlap.
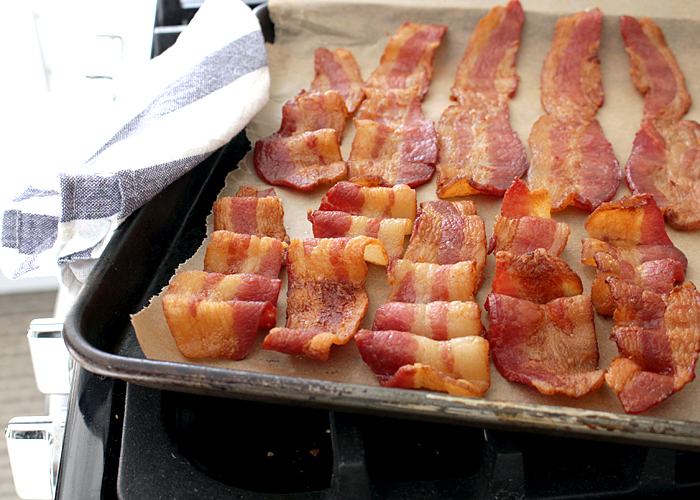
- Carefully transfer the entire baking sheet and rack to the oven. Roast the bacon until your preferred doneness. Start checking the bacon after approximately 15 minutes. When the bacon is done, remove baking sheet from oven to cool. The bacon continues to cook for a minute or two after you remove it from the oven, so if you like, soft, chewy bacon, remove the baking sheet a little earlier than you would expect.
- The bacon needs to cool into its shape. If you try to remove the bacon from the rack too soon, it may not retain its wavy shape. Once the bacon is cool to the touch, carefully lift each strip off the rack. There is no need to "drain" the bacon, as a lot of fat has dripped right off onto the foil in the baking sheet.
Pro-tips and Notes
- Thinner Slices are Better: Oven-cooking bacon works for any type of bacon! The method for creating them into waves, however, works best with regular, grocery-store bacon. Thick-cut slices are harder to shape onto the rack, and tend not to hold the wavy shape as well as thinner slices.
- Save the Rendered Bacon Fat. Carefully pour off the rendered bacon fat to a heat-proof bowl to either harden then discard or use in some way.
- Line the Baking Sheet with aluminum foil for faster, easier clean-up. Just roll up the aluminum foil and toss it in the trash; the baking sheet probably needs nothing but a rinse! You can also use parchment paper to line the baking sheet to catch the bacon grease, but it's a little harder to keep parchment paper in place up the sides of the baking sheet.
- Make a Rack Out of Aluminum Foil. Create a "rack" using pieces of aluminum foil. Line a baking sheet exactly as outlined above. Tear off about 6 sheets of aluminum foil about 10 inches wide. Crumple each aluminum sheet into a long bars, about 2 inches tall when you lay them down. Line up the aluminum "bars" on the baking sheet about 1 inch apart. Shape the bacon strips over the aluminum "bars." There won't be as much space between the baconand the drippings in the baking sheet, but that's ok. This is actually the easiest to clean-up since you don'teven have to wash a rack.

Oven-Cooked Bacon Recipe
Equipment
- rimmed baking sheet
- aluminum foil
- baking rack
Ingredients
- 1 package bacon 10-, 12-, or 16-ounce package
Instructions
- Move oven racks to make sure there is enough space for the baking sheet with the baking rack on it. Heat oven to 400°F.
- Line the baking sheet with aluminum foil, going up and over the sides. The aluminum foil will catch the bacon grease as it renders out and drips into the pan, making clean-up easier.
- Place a strip of bacon with one end on the far edge of the rack. Fold the end over the bar and let it hang down by about 1-inch. Carefully push small sections of the rest of the bacon strip down between the bars of the rack, letting the sections hang down about ¾-inch. The bacon shrinks as it cooks and will lift itself up slightly from between the bars. Depending on how many waves you shape into the bacon strip, let the end piece hang down through the bars as long as it's not too long, or pinch the end around a bar. See photo for guidance.
- Repeat the same process with all of the bacon strips. It is okay if the bacon strips touch each other, but do not let them overlap.
- Carefully transfer the entire baking sheet and rack to the oven. Roast the bacon until your preferred doneness. Start checking the bacon after approximately 15 minutes. When the bacon is done, remove baking sheet from oven to cool. The bacon continues to cook for a minute or two after you remove it from the oven, so if you like, soft, chewy bacon, remove the baking sheet a little earlier than you would expect.
- The bacon needs to cool into its shape. If you try to remove the bacon from the rack too soon, it may not retain its wavy shape. Once the bacon is cool to the touch, carefully lift each strip off the rack. There is no need to "drain" the bacon, as a lot of fat has dripped right off onto the foil in the baking sheet.


Leave a Reply